How to Add a Shared Mailbox in Different Outlook Clients
What Is a Shared Mailbox in Microsoft 365?
Shared mailboxes in Microsoft 365 are commonly used by teams to manage group email
addresses like info@, support@, or sales@.
They allow multiple users to work from one inbox without requiring a separate license.
One Inbox, Multiple Users
Several team members can read, reply, and manage emails from the same mailbox,
keeping communication organized and consistent.
No Extra License Needed
Shared mailboxes do not need a Microsoft 365 license, as long as they stay within
supported size limits.
Professional Team Communication
Emails are sent from a shared address, not a personal one, which improves trust
and clarity for customers and partners.
✔
Works across Outlook Desktop, Outlook Web, Outlook for Mac, and Mobile
✔
Designed for team-based email handling
✔
Centralized access with proper permissions
Prerequisites
Before You Add a Shared Mailbox
Before setting up a shared mailbox in Outlook, make sure the following requirements
are met to avoid access or sending issues.
✔
You have been granted Full Access permissions
(and optionally Send As or Send on Behalf)
✔
Your account is part of Microsoft 365 / Exchange Online
✔
Permissions have been assigned correctly by an administrator
Note: Permission changes are not instant. It can take
15–60 minutes for access and sending rights to apply across all Outlook clients.
1. Outlook for Windows (Desktop App)
Automatic Method (Recommended)
If permissions are set correctly, Outlook will add the shared mailbox for you automatically.
No manual setup is required.
Close Outlook completely.
Reopen Outlook.
Check the left folder pane — the shared mailbox should appear automatically.
✅ This is the most common and preferred method, as it requires no manual configuration.
Manual Method
If the shared mailbox does not appear automatically, you can add it manually using
the steps below.
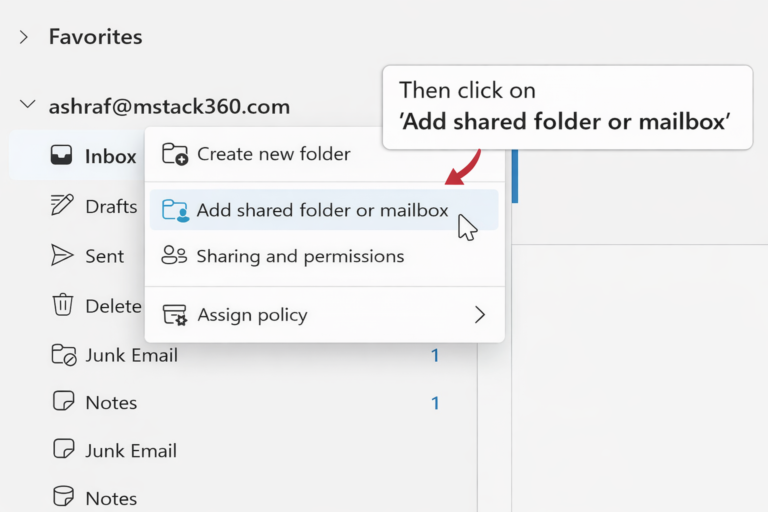
Open Outlook.
Go to File → Account Settings → Account Settings.
Select your account and click Change.
Click More Settings.
Open the Advanced tab.
Click Add and enter the shared mailbox email address.
Click OK → Next → Finish.
Restart Outlook.
2. Outlook on the Web (OWA)
Access a Shared Mailbox in Outlook Web
Outlook Web lets you open shared mailboxes without adding them permanently to your
account. You can either open them temporarily or add them to your folder list.
Option A: Open in a New Tab
Go to outlook.office.com.
Click your profile picture (top right).
Select Open another mailbox.
Enter the shared mailbox email address.
Click Open.
Option B: Add to Folder List
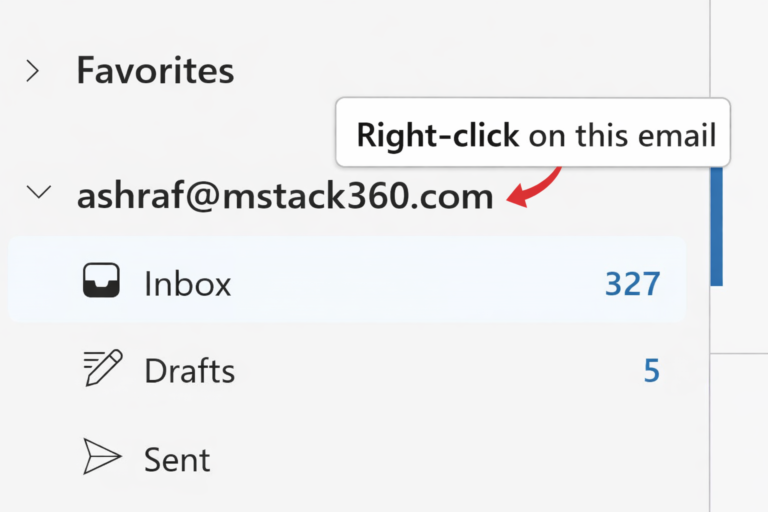
In Outlook Web, right-click Folders.
Select Add shared folder.
Enter the shared mailbox email address.
Click Add.
Tip: Adding the mailbox to your folder list keeps it visible every time
you sign in to Outlook Web.
3. Outlook for Mac
Outlook for Mac
Shared mailboxes in Outlook for Mac can appear automatically if permissions are set
correctly. If not, you can add them manually.
Automatic Method
Close Outlook for Mac.
Reopen Outlook.
Check the left-hand folder pane for the shared mailbox.
This method works in most cases and does not require any manual configuration.
Manual Method
If the shared mailbox does not appear automatically, follow the steps below.
Open Outlook for Mac.
Go to Tools → Accounts.
Select your account.
Click Advanced.
Open the Delegates tab.
Under Open these additional mailboxes, click +.
Enter the shared mailbox email address.
Close the window and restart Outlook.
4. Outlook Mobile App (iOS & Android)
Sending Emails from a Shared Mailbox
Outlook for Mac
Shared mailboxes in Outlook for Mac can appear automatically if permissions are set
correctly. If not, you can add them manually.
Automatic Method
Close Outlook for Mac.
Reopen Outlook.
Check the left-hand folder pane for the shared mailbox.
This method works in most cases and does not require any manual configuration.
Manual Method
If the shared mailbox does not appear automatically, follow the steps below.
Open Outlook for Mac.
Go to Tools → Accounts.
Select your account.
Click Advanced.
Open the Delegates tab.
Under Open these additional mailboxes, click +.
Enter the shared mailbox email address.
Close the window and restart Outlook.
Sending Emails from a Shared Mailbox
To send emails from a shared mailbox address, Outlook needs the correct sending
permissions and the From field must be visible.
Required: You must have Send As or
Send on Behalf permission for the shared mailbox.
Create a new email message.
Click the From field.
Select or type the shared mailbox email address.
Write and send your email as usual.
Not seeing the From field?
Enable it from the email options menu in Outlook, then try again.
Common Issues & Troubleshooting
Shared Mailbox Not Appearing?
If your shared mailbox does not show up in Outlook, follow the checks below in order.
Basic Troubleshooting
✔
Wait up to 1 hour after permissions are assigned
✔
Restart Outlook completely
✔
Try adding the mailbox manually
✔
Check permissions in the Exchange Admin Center
Duplicate Mailboxes Showing?
✔
Remove manually added mailboxes if auto-mapping is enabled
✔
Use either auto-mapping or manual add — not both
Important: Adding a shared mailbox manually while auto-mapping is active
can cause duplicate mailboxes to appear in Outlook.
Final Thoughts
A simple summary to keep in mind as you work with shared mailboxes in Microsoft 365.
Shared mailboxes are a powerful collaboration tool in Microsoft 365 when set up
correctly. Each Outlook client handles them slightly differently, but once
permissions are in place, access is usually seamless.
If you need help setting up shared mailboxes, managing permissions, or troubleshooting
Outlook issues, feel free to reach out for support.
🚀 Make Your Team More Productive
Need help setting up shared mailboxes or managing Outlook permissions?
Our Microsoft 365 specialists at MStack360 are ready to assist
and ensure everything works smoothly.