
Master your Outlook email signature
An email signature is your digital stationery. It gives everyone you email instant context about who you are, what you do, and how to reach you. Setting up a clean signature across all your devices takes only a few minutes, and this guide walks you through it on every version of Outlook.
Four golden rules for a good signature
Before you start building, keep these four points in mind. They will keep your signature professional and stop it from being flagged as spam.
Keep it clean and simple
Stick to the details that matter: your full name, job title, department, company name, phone number, and address. Resist the urge to add everything.
Go easy on the links
Too many links, or link shorteners like Bitly, make spam filters suspicious. Skip social media icons and try to include just one main link.
Skip the legal disclaimer
Long confidentiality blocks at the bottom of an email rarely hold up and add clutter. To protect sensitive content, use a sensitivity label instead, which is a built in Microsoft 365 tag that controls how a message can be shared.
Optimize your images
Keep any logo or image under 100 KB. Never insert a picture from a folder path on your own computer, such as C:\Users\..., because the person receiving it will not be able to see it.
Stay away from VML tags, a hidden formatting code that can quietly turn an image inside your signature into an attachment. Adding pictures through Outlook's own inline image tool sidesteps this completely.
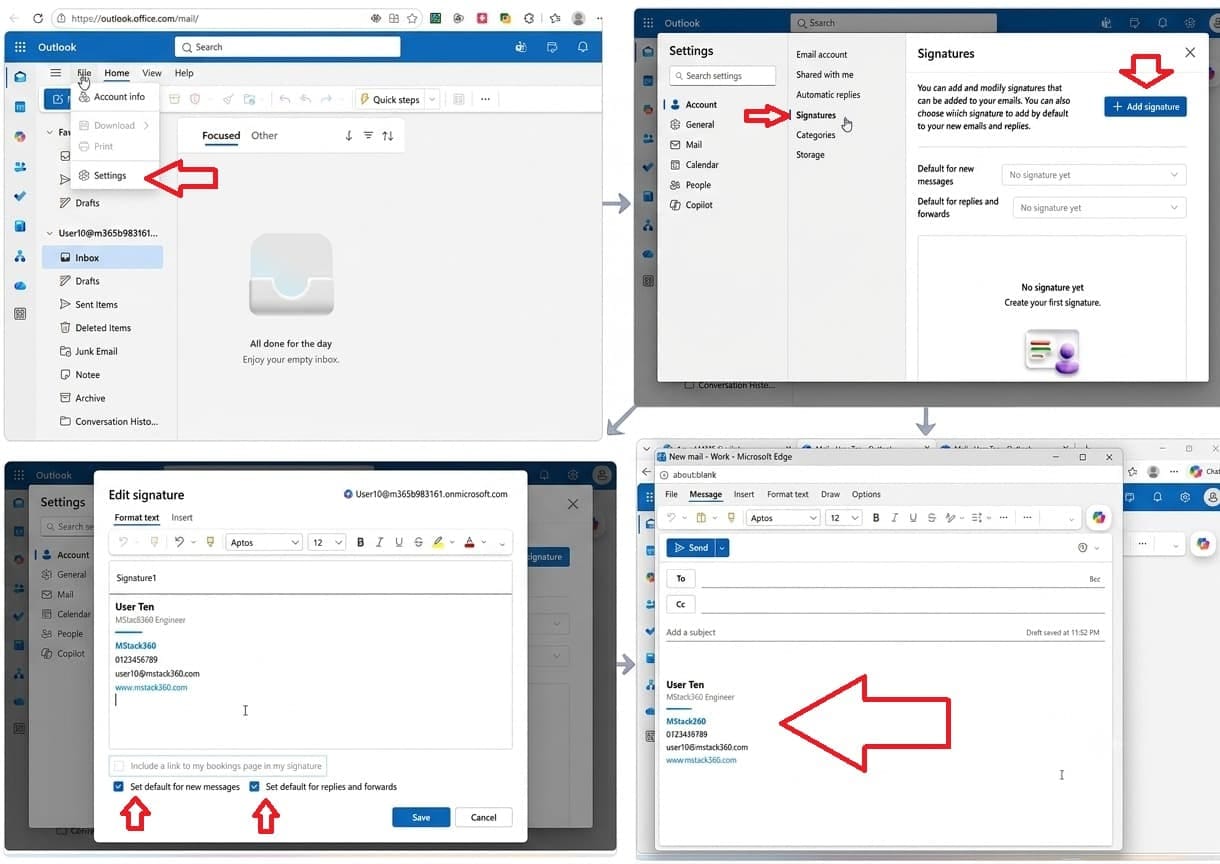
Set it up on Outlook on the web or new Outlook
Whether you use Outlook in a browser or the refreshed new Outlook app for Windows, the steps are the same.
Open settings
Click the settings gear icon in the top menu bar.
Go to signatures
Head to Account, then Signatures. On some layouts this sits under Mail, then Compose and reply.
Create a signature
Click Add signature, or New, give it a descriptive name, and pick which email account it belongs to.
Compose and format
Type your details straight into the formatting editor.
Set your defaults
Use the dropdown menus to choose this signature for New messages and for Replies and forwards.
Save
Click Save. From now on, every new email you draft will carry your signature automatically.
Set it up on classic Outlook for Windows
If you use the classic desktop version of Outlook on Windows, here is the path.
Open options
Click File in the top left corner, then choose Options.
Open the signatures editor
Select Mail from the left hand menu, then click the Signatures button under Compose messages.
Draft your signature
Click New, give it a name, and build your sign off in the text editor.
Assign your defaults
Choose your email account, then pick which signature attaches to New messages and to Replies and forwards.
Save
Click OK to save your changes.
Set it up on Outlook for Mac
On a Mac, the signature settings live under Outlook's preferences.
Open settings
Launch Outlook for Mac and select Settings, which may be labelled Preferences.
Click signatures
Open the Signatures section.
Create a new entry
Click the plus icon to add a signature, give it a name, and type in your details.
Set it as default
Choose your new signature as the default for both new emails and replies.
Set it up on the Outlook mobile app
The steps below cover both iPhone and Android in the Outlook mobile app.
Open your account menu
Open the Outlook app and tap your profile avatar, or the menu icon in the upper left corner.
Go to email signature
Tap the settings gear icon, then select Email signature.
Type your details
Enter your contact details, or tap Use a different signature if you want one that differs from your desktop version.
Save
Tap the checkmark in the upper right corner to save.
Troubleshooting common issues
If your signature is not behaving, one of these three fixes usually sorts it out.
This is almost always the default setting. Re open your signature settings and check that your signature is chosen in the dropdowns for New messages and for Replies and forwards, rather than being set to No signature.
Keep each image under 100 KB, and embed it using Outlook's inline image tool rather than pointing to a folder on your own computer. A local folder path will not travel with the email, so the person receiving it sees nothing.
This usually comes from pasting text out of Microsoft Word, which carries hidden background formatting that breaks the layout. Build your signature directly inside Outlook's own editor, and stick to standard fonts like Arial or Calibri.
Want your whole team on one branded signature?
Setting up a consistent, professional signature across every mailbox in your business is one of those small things that quietly lifts how your company looks in every email. We can roll it out for you and keep it tidy as your team changes.
Book a session with MStack360